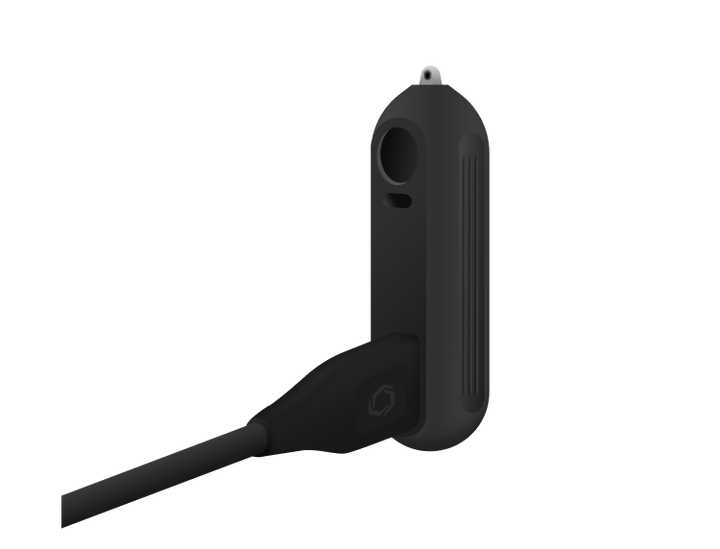
HYDROP
HYDROP Usage and Data Chart Guide
1. If this is your first time using the device, connect the charging cable first to activate it initially.
1.1 Charging: connect the charging cable:
1.2 How to check battery level:
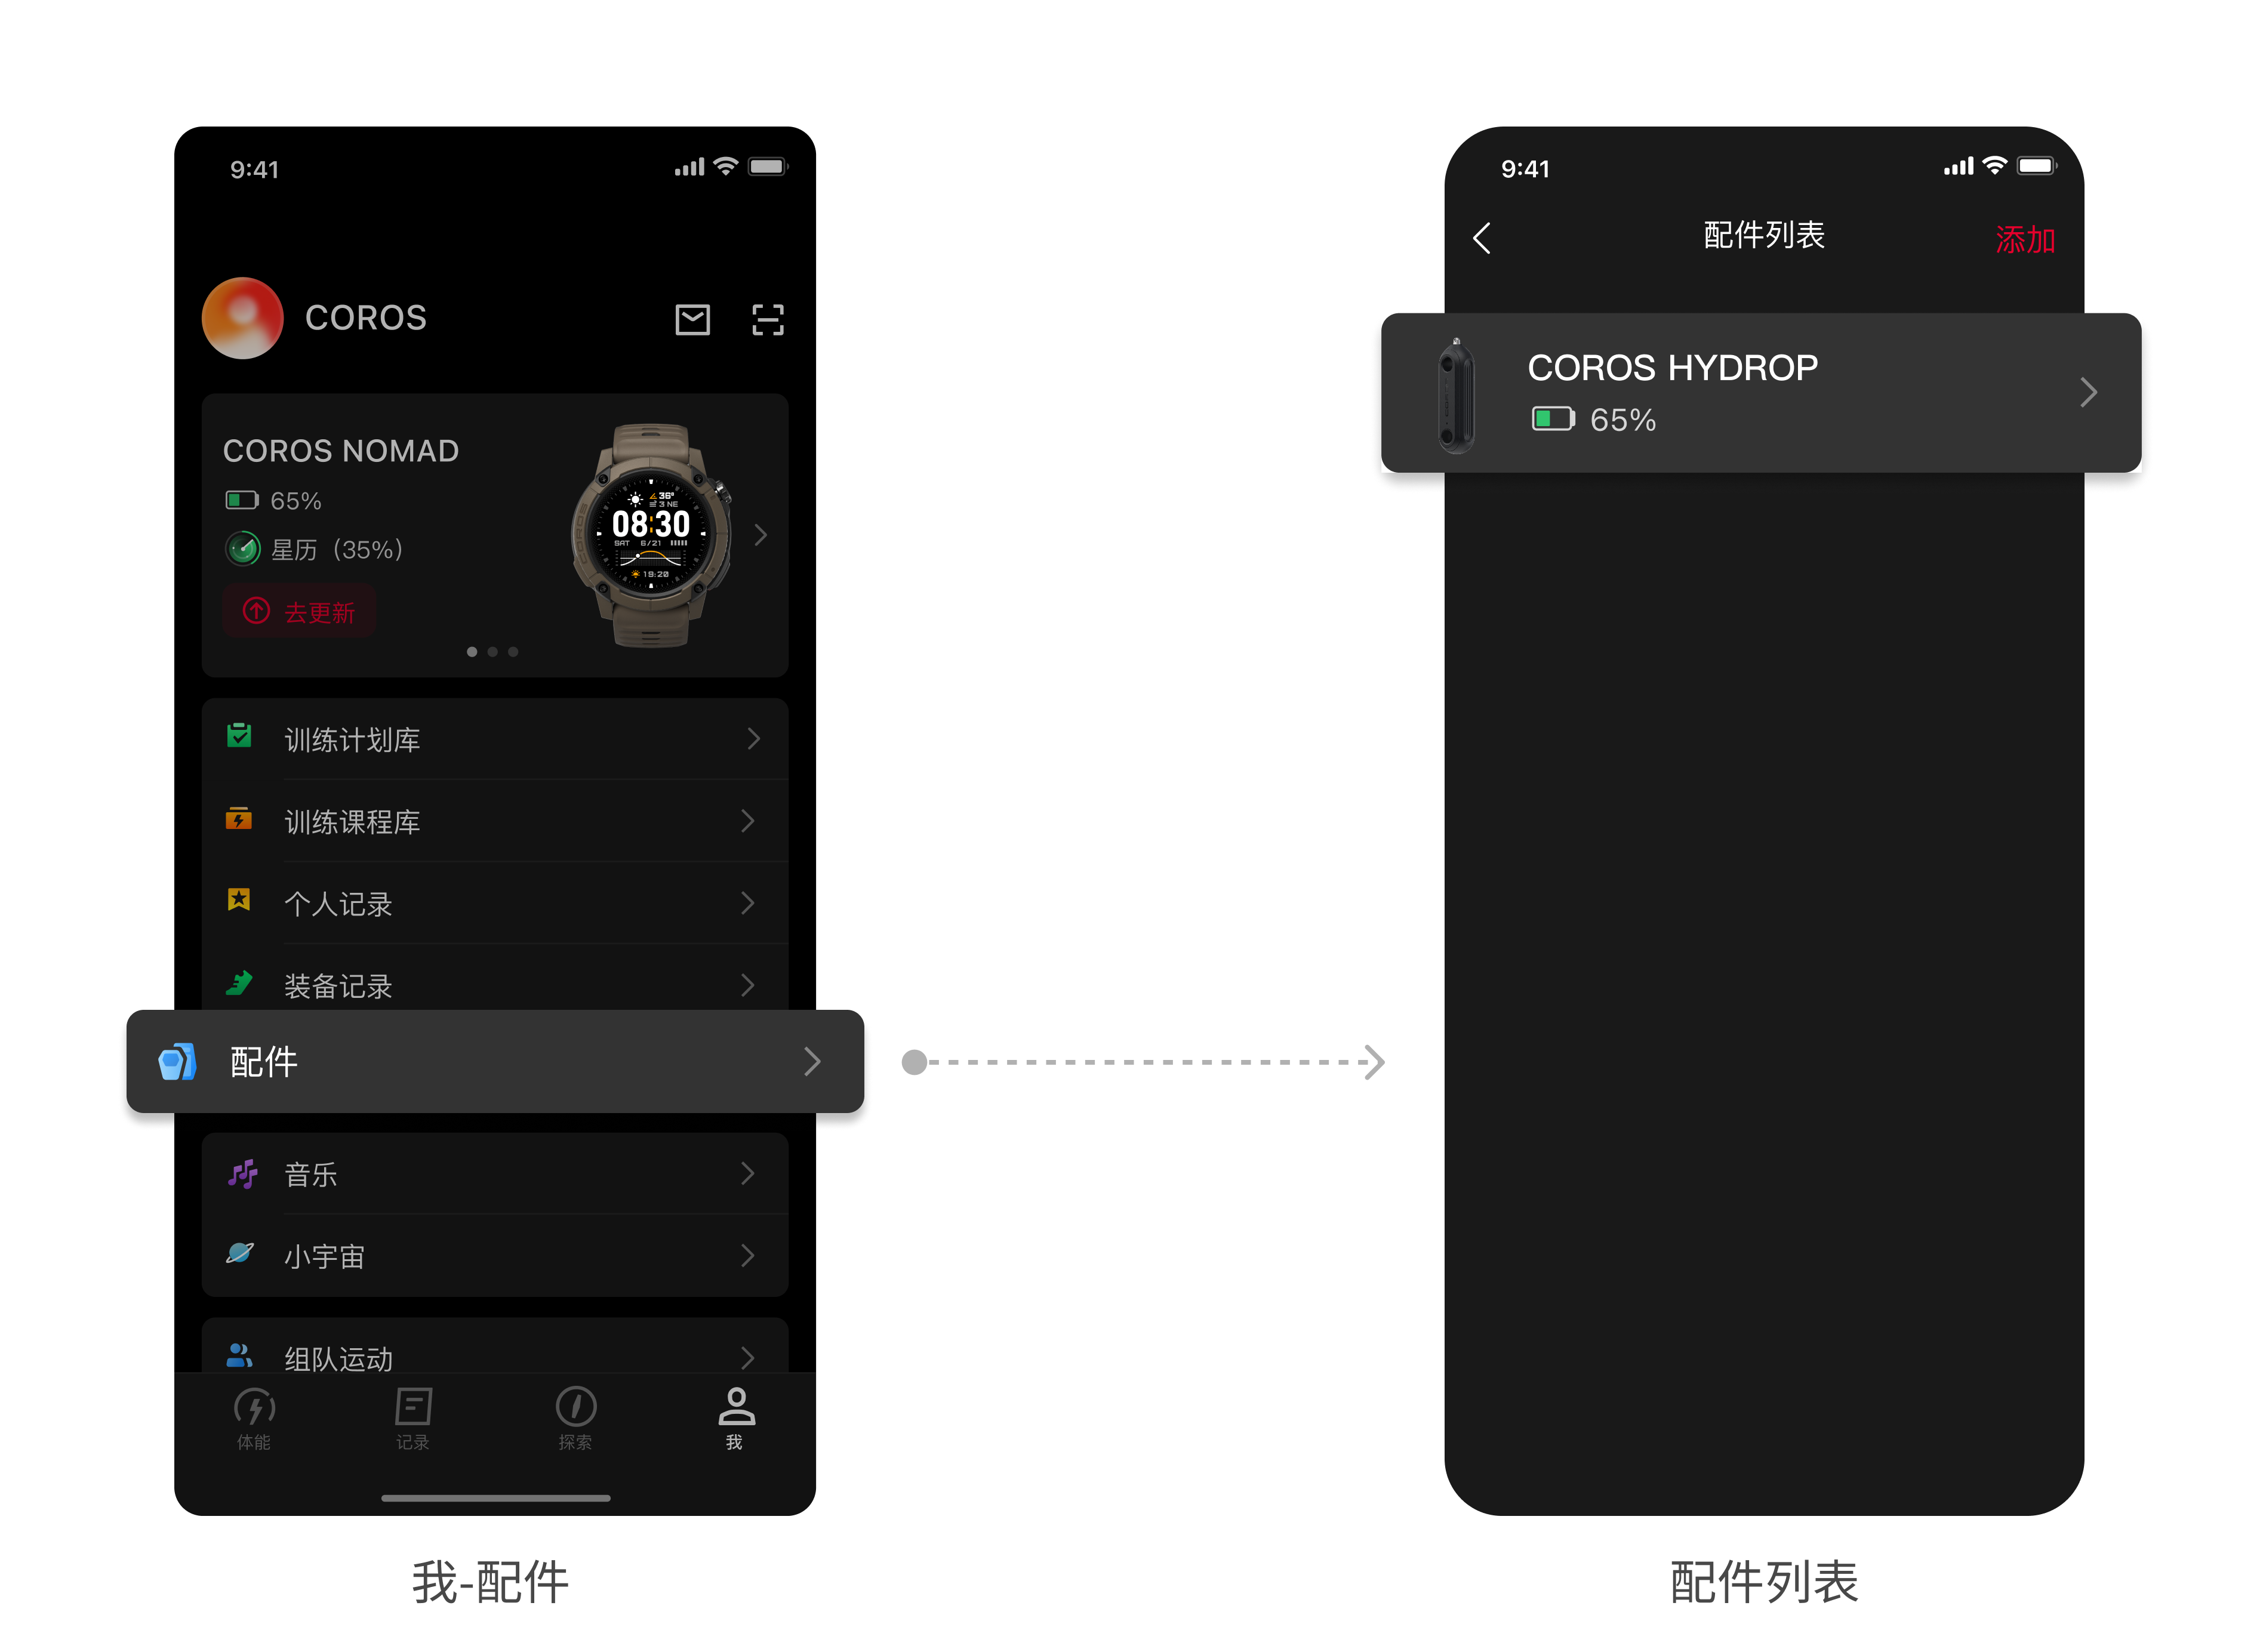
In the app: Me -- Accessories -- HYDROP device card
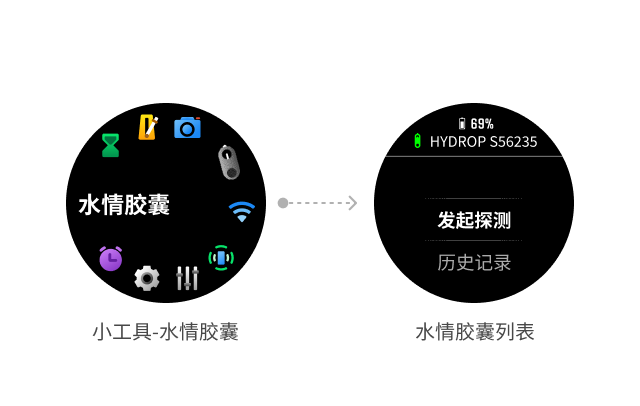
On the watch: Toolbox -- Water Condition Capsule
2. How to connect HYDROP via Bluetooth:
2.1 Connect HYDROP to the watch via Bluetooth:
2.1.1 During first activation, connect the charging cable. When the indicator flashes, the device enters Bluetooth pairing mode;
2.1.2 If it is not the first activation, shake HYDROP to make sure it has exited sleep mode;
2.1.3 On the watch, go to: Settings -- Accessories -- Add Bluetooth Accessory;
2.1.4 Find the HYDROP device and start connecting;
2.1.5 After the connection success message appears, the HYDROP device will be shown in the device list.
2.2 Connect HYDROP to the phone via Bluetooth (make sure Bluetooth is enabled on the phone, and shake HYDROP to ensure it has exited sleep mode)
2.2.1 In the app, go to Me -- Accessories -- Add accessory device;
2.2.2 Scan the QR code included with HYDROP or tap the Bluetooth connect button below;
2.2.3 The app will automatically detect the HYDROP device and begin connecting;
2.2.4 After the connection success message appears, the HYDROP device will be shown in the accessory device list.
*The HYDROP widget is available in the widget tray only after a HYDROP device has been bound in the accessory list.
3. Troubleshooting:
3.1 Overheat protection sleep handling:
3.1.1 When the HYDROP device temperature becomes too high, it enters overheat protection sleep mode;
3.1.2 Cool it down by immersing it in water or placing it in a cool, ventilated area until it exits overheat protection sleep mode.
*Submerging the probe in water and stirring it thoroughly can speed up cooling. When storing it, avoid leaving it on a sun-exposed deck to reduce the risk of internal electronic damage.
3.2 Low-battery protection sleep handling:
3.2.1 When the HYDROP device battery is too low, it enters low-battery protection sleep mode;
3.2.2 Connect the charging cable and charge it first.
3.3 Device-in-use handling:
3.3.1 If HYDROP is already connected to a watch, it is currently being used by another device;
3.3.2 If you need to connect to this device, disconnect the original connection first;
3.3.3 Reconnect HYDROP by following the instructions in 2.1 or 2.2.
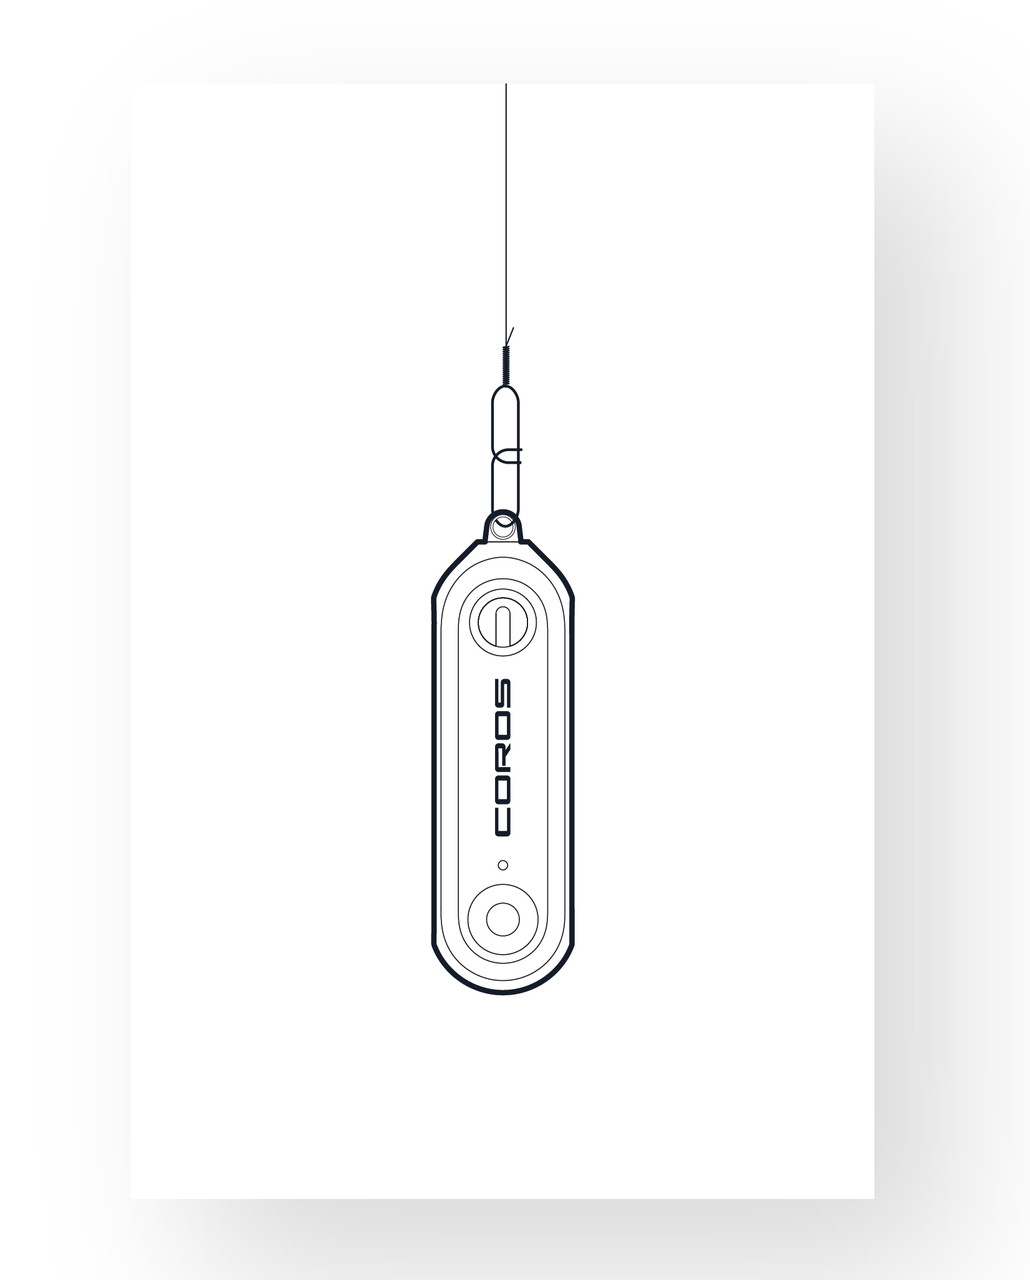
4. How to connect the probe and the fishing rod:
4.1 You can use the included connector or lure snap;
4.2 Connect HYDROP and the line as shown;
*It is recommended to use a line with lower tensile strength than the main line to connect the sinker, reducing the risk of losing it to a snag.
5. How to start a scan:
5.1 Start a scan from Widget -- Water Condition Scan:
5.1.1 On the watch, enter Widget -- HYDROP;
5.1.2 Select the HYDROP device you want to use, wait for a successful connection, then press the confirm dial to start scanning;
*When connected, the prompt displayed is: Please cast the probe into the water.
*The HYDROP widget and the water condition probe page in lure fishing mode are shown only if HYDROP has already been bound in the watch accessory device list.
5.2 Start a scan from the HYDROP page in fishing activity mode:
5.2.1 Open lure fishing mode on the watch;
5.2.2 Press the lower-left function button or swipe left/right to enter the HYDROP status and scan preparation page*, then wait for a successful connection;
5.2.3 Select the HYDROP device you want to use, wait for a successful connection, then press the confirm dial to start scanning;
5.2.4 When connected, the prompt displayed is: Please cast the probe into the water.
*This function page is available only when HYDROP has been bound.
6. Actions during scanning:
6.1 Follow the prompts on the watch and cast HYDROP into the water;
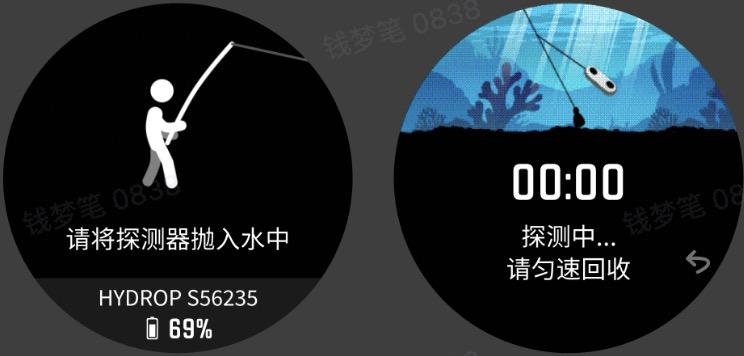
6.2 Wait until it sinks to the bottom, then retrieve it at a steady speed until it leaves the water;
6.3 During scanning, press the back button to choose from the menu: continue scanning or cancel scanning;
6.4 After HYDROP leaves the water, it automatically reconnects to the watch and transfers data;
6.5 After transfer is complete, the screen automatically jumps to the scan record display page. Scroll below the chart to enter the splashdown direction and distance.
6.6 Enter the casting direction and distance, or skip the input.
7. How to start another scan:
7.1 In Widget -- HYDROP or in fishing activities;
7.2 When HYDROP is connected, after one measurement ends and the chart is displayed, press the back button to return to the scan preparation page, then repeat the steps in 5.1.2-6.6.
7.3 If one measurement has ended but data is still being transferred and HYDROP enters the water again, a prompt appears: Transfer interrupted. Please reconnect to complete the transfer, with an option to abandon the transfer.
8. How to view scan data: (summary page and time-sliced detail page)
8.1 On the HYDROP status and scan preparation page, scroll down with the dial to view previous history records.
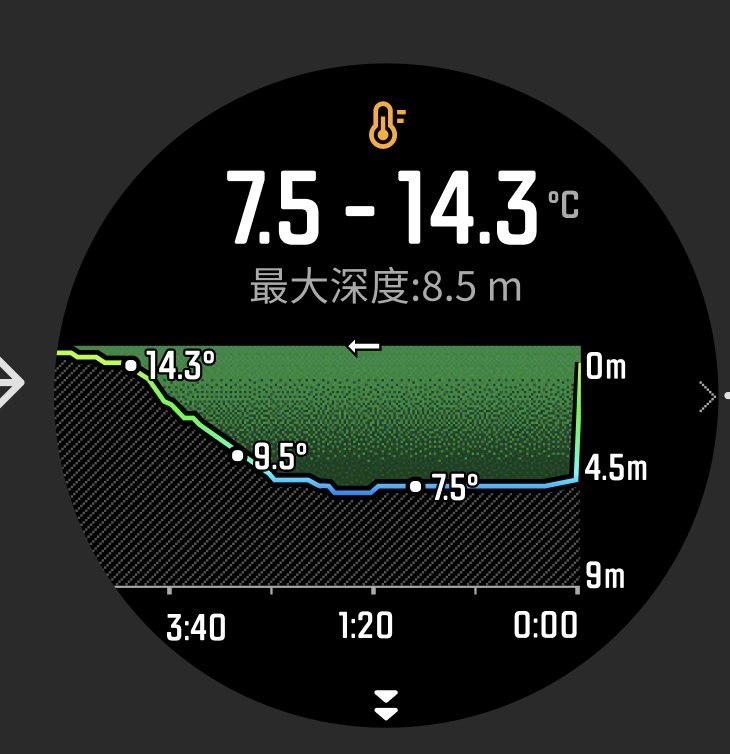
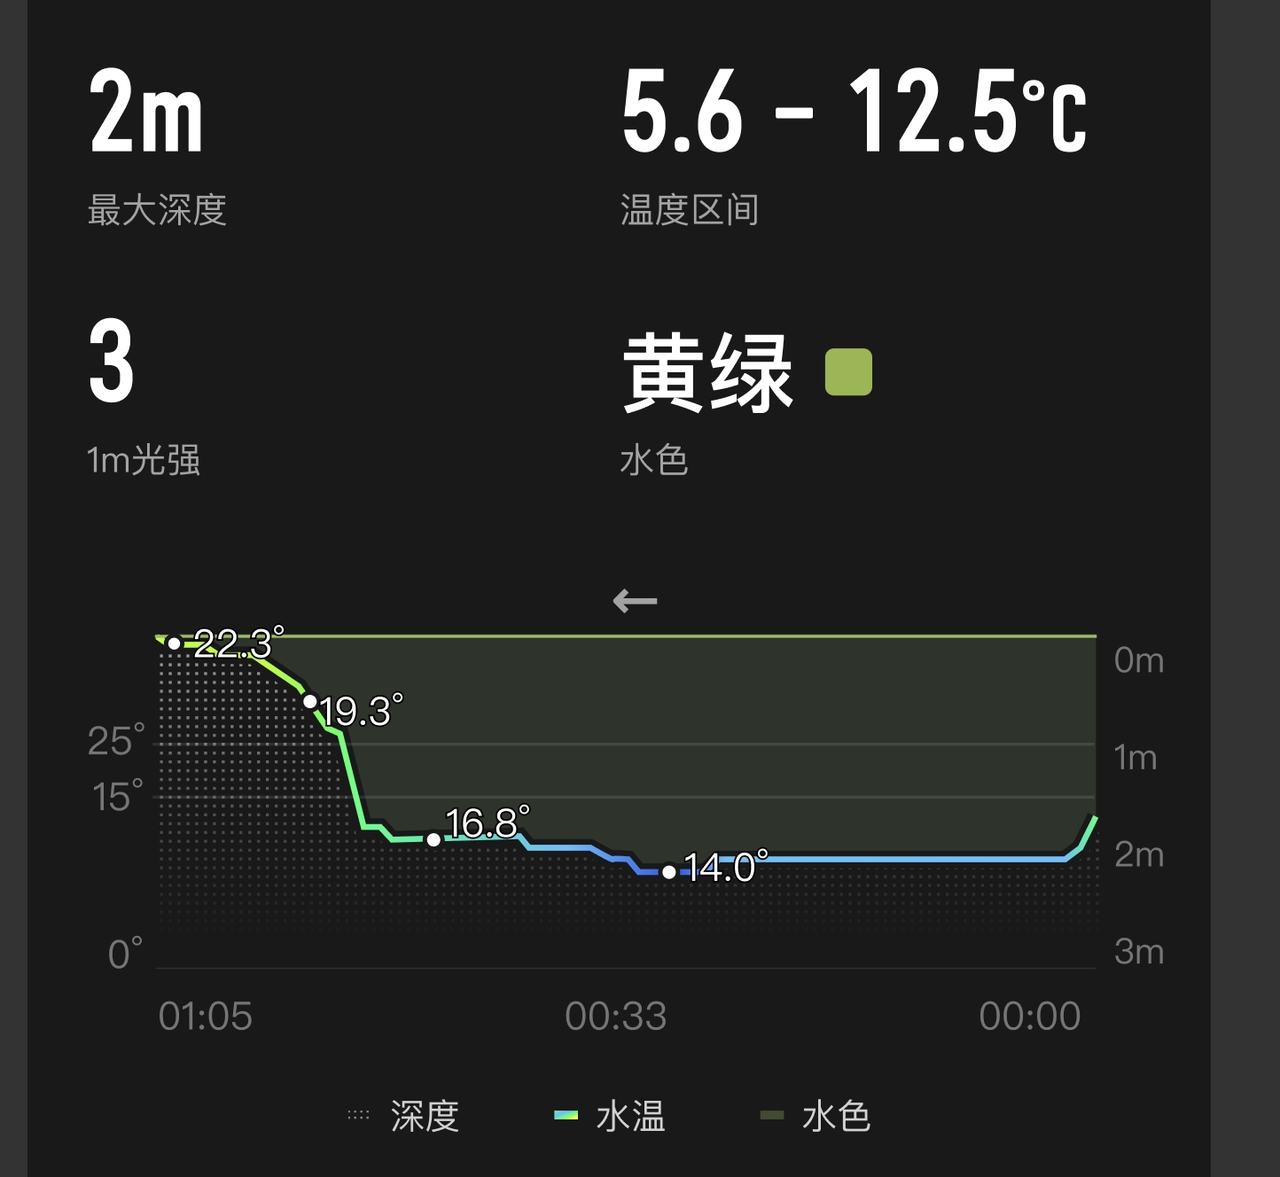
8.2 After each scan transfer is completed, the watch automatically jumps to that scan record display page -- Summary.
8.3 On the summary page, press the confirm key and then turn the dial, or tap the screen and drag left or right, to view time-sliced data such as depth and temperature at each position.
8.4 On the summary page, scroll down directly with the dial to view light intensity and water color data.
8.5 On the summary page, press the confirm key or drag the screen left or right to enter the time-sliced data page, then turn the dial to view each data slice.
8.6 Press the back button while viewing time-sliced data to return to the summary page.
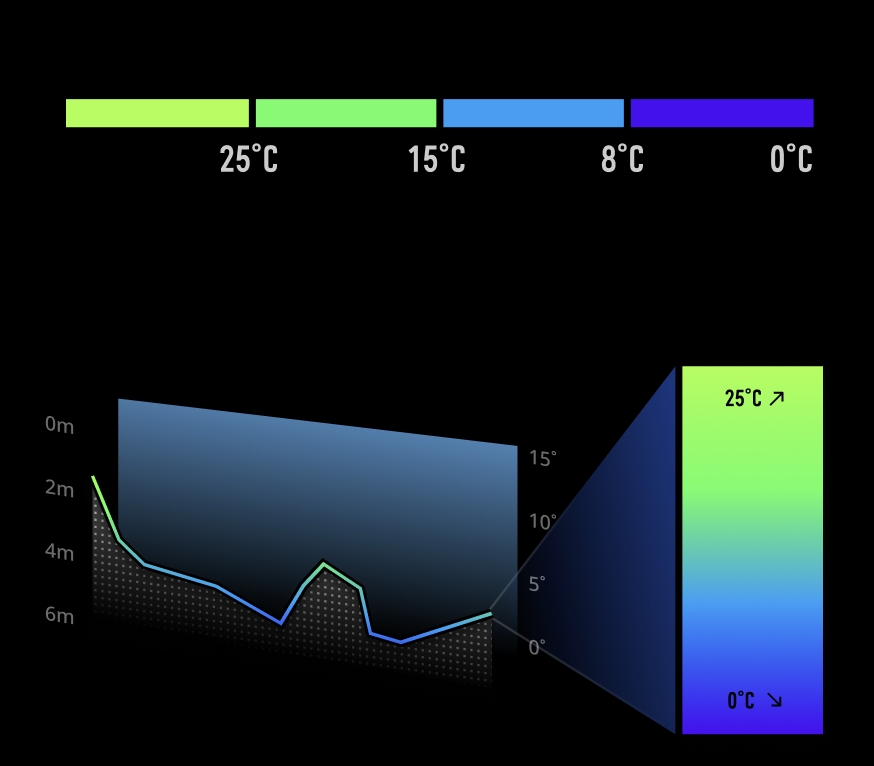
9. Meaning of water temperature stratification colors: (as shown, the temperature curve uses 0, 8, 15, and 25 degrees as threshold temperatures, dividing it into four color bands. Points on the curve represent temperature values.)
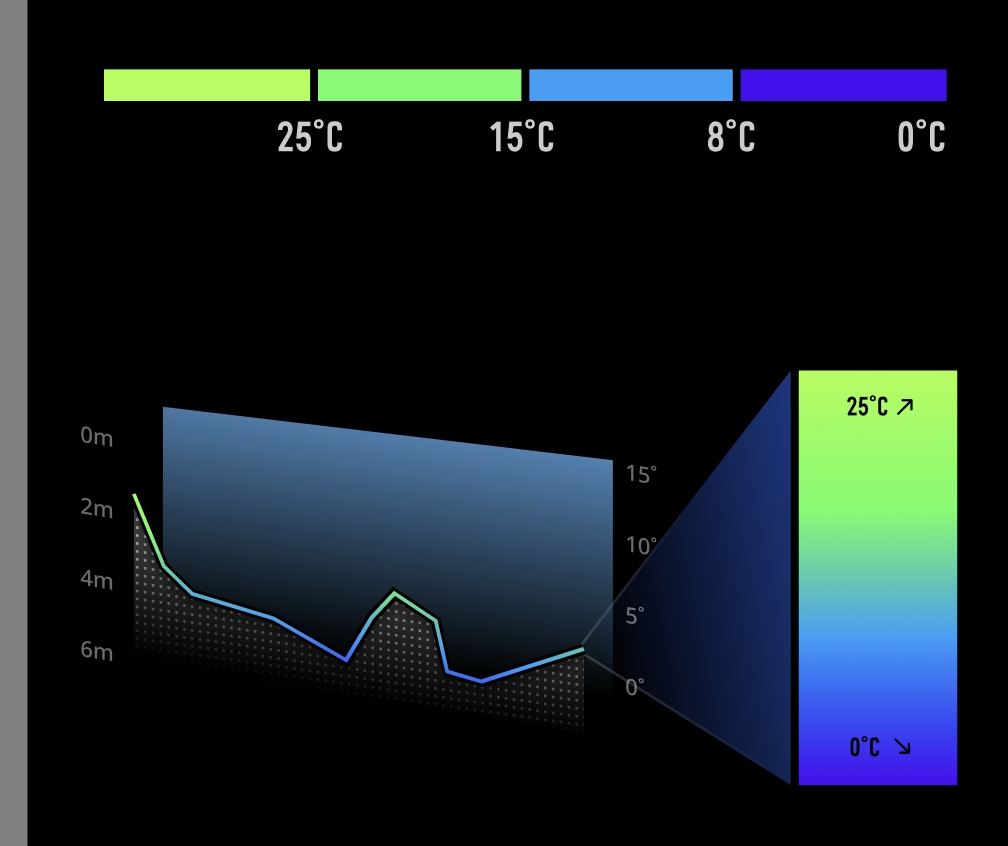
9.1 The colored background blocks in the data table use different colors to show the relationship between temperature layers and depth in the water body.
9.2 Different colors let you see the temperature stratification of the tested water body.
9.3 Yellow -- green -- blue indicates temperatures from high to low. The corresponding temperature ranges are as follows:
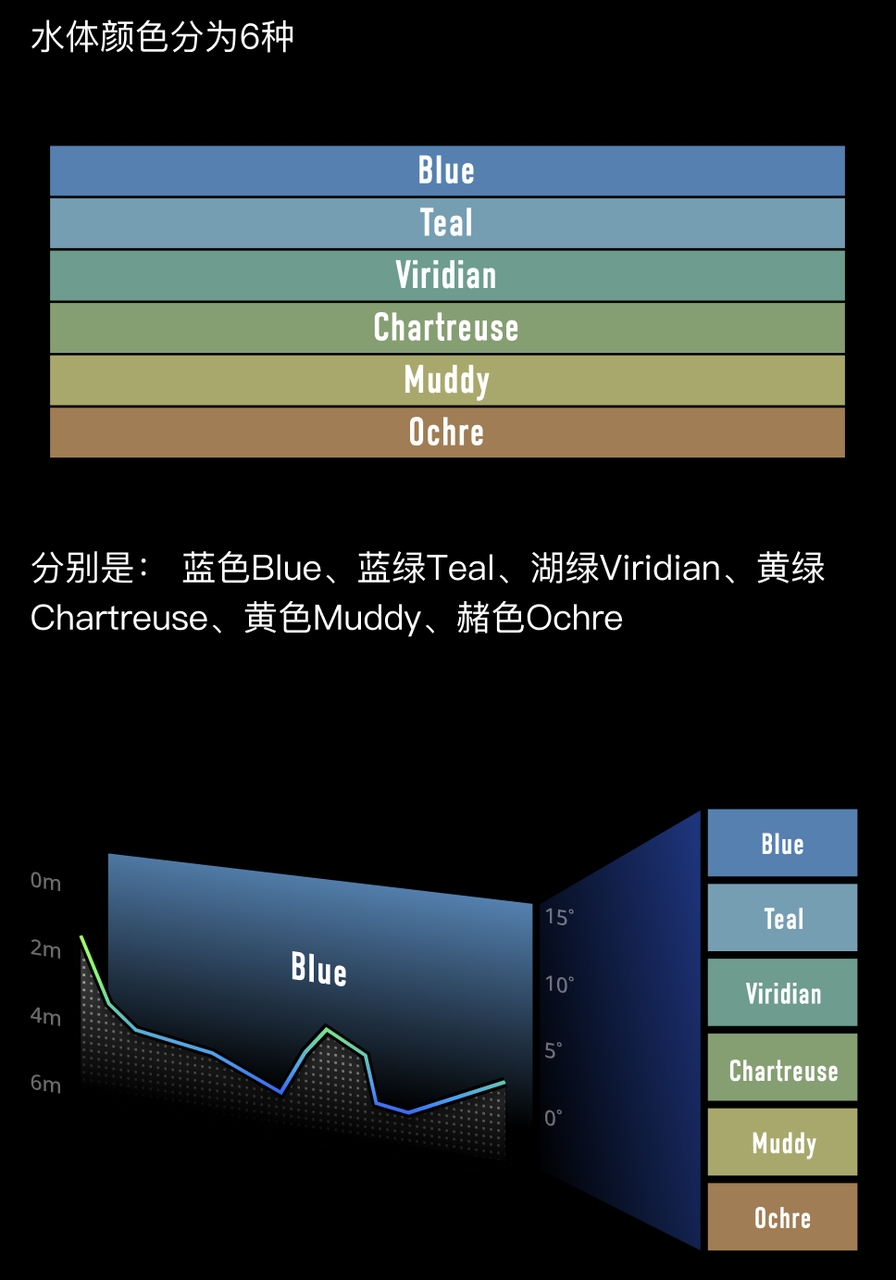
10. Water color chart:
10.1 Water color is divided into 6 types, as shown:
11. Meaning of underwater light intensity:
11.1 Underwater light intensity is divided into 6 levels, representing the light intensity near the water surface under these environmental conditions, as shown:
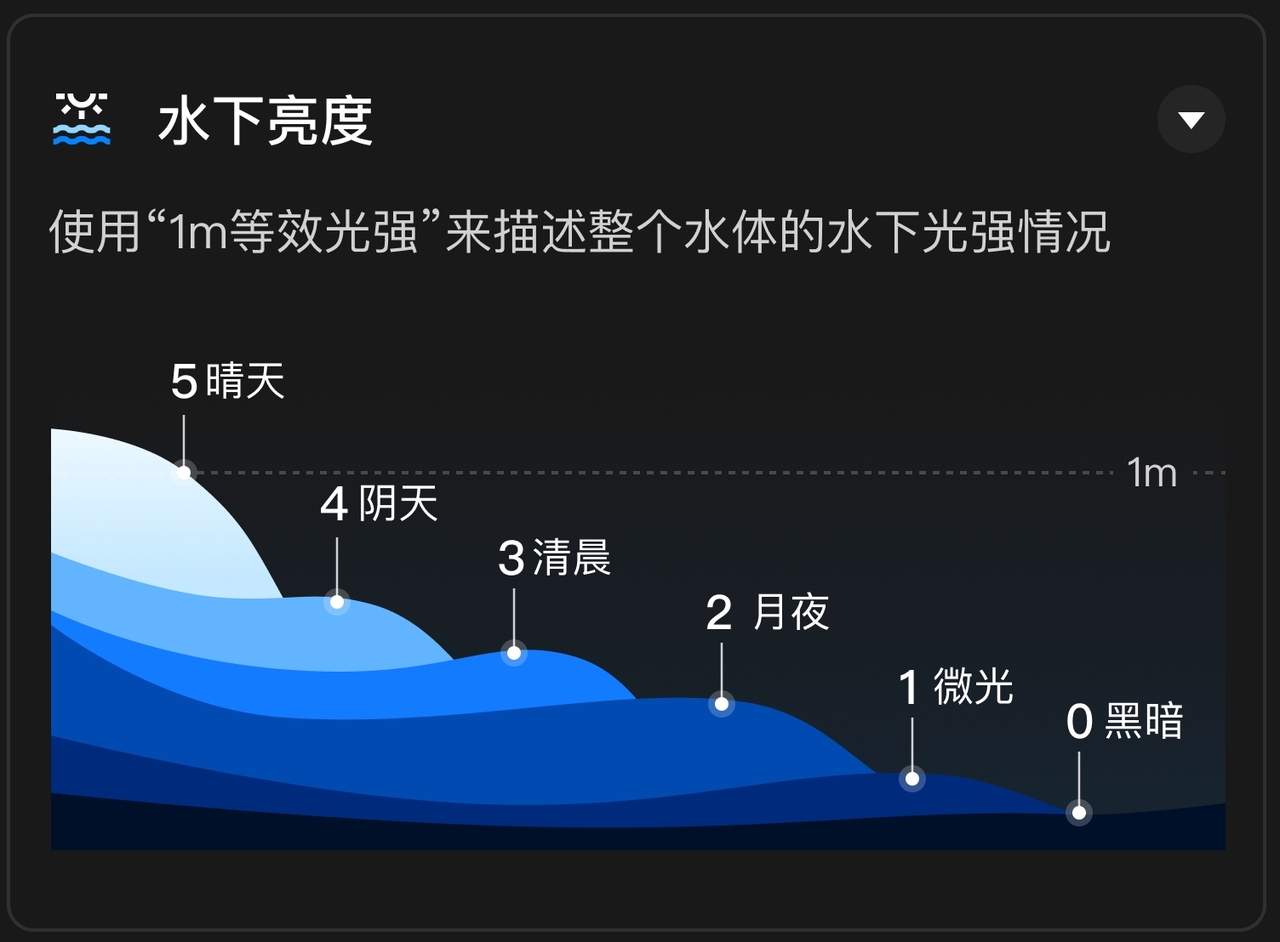
11.2 The underwater 1 m equivalent light intensity is a general evaluation of the overall light intensity in the water body.